Building a Lord of the Rings keyboard
Every goal has a sequence swirling beneath it like the vortex of a whirlpool.—“Sequences” by Patrick F. McManus
It started when I noticed the “A” key on my keyboard turned temperamental. Well, it really started before that because I noticed I was misspelling a lot of words, which could be caused by any number of problems:
- stress
- not getting enough rest
- boredom at work
- old age
But then I discovered that the “A” key on my keyboard only fired every other time I pressed it. For years I’ve used Logitech keyboards, because I’ve found their devices to have a good quality to price ratio. Maybe I was wrong since I have two K375s keyboards with failing keys and I’ve disposed of two K750 solar powered keyboards that stopped working altogether.
My son, who is somehow old enough to be in college, let me borrow his mechanical keyboard for a day or two. Most modern keyboards, including the Logitech models I’ve used, use dome switches. When you press a keycap, it compresses a dome to complete the circuit on a pressure-sensitive membrane underneath. By contrast, each keycap in a mechanical keyboard is attached to its own individual switch. As a result, mechanical keyboards tend to be more durable and can also be repaired if a switch starts to fail.
Mechanical keyboards also tend to be expensive. The Logitech keyboard I’m replacing costs $35 right now on Amazon. For that price, you can buy 120 Gateron Red switches. The board and keycaps are extra. Like any other hobby, keyboard enthusiasts are willing to pay a premium to get what they want. As I researched my options and wondered how anyone would pay so much for purely cosmetic keycaps, I discovered the purely cosmetic Lord of the Rings keycaps. And so I’m typing this post using this keyboard:
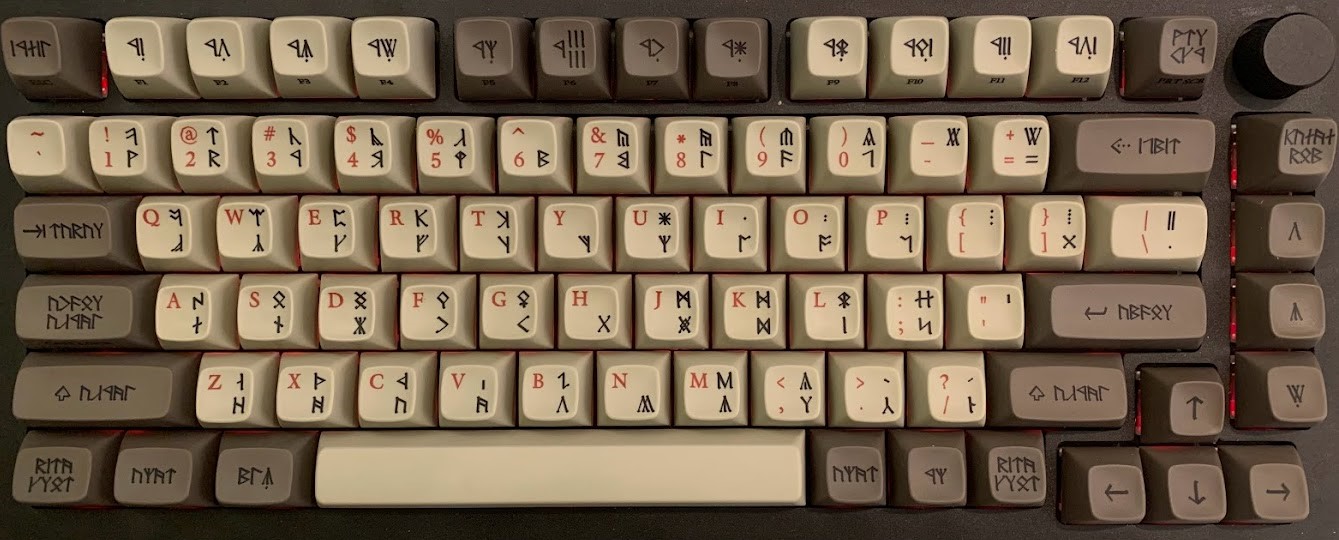
What you see in that picture cost an order of magnitude more than just replacing my previous keyboard. But typing, which is my primary method of working, is also an order of magnitude more satisfying with the new keyboard. At the risk of digging too deep, the rest of this post covers what I bought, how I assembled it and the sequence I’m still working through to get everything just right.
After buying the Dwarvish (training) base kit and the Dwarvish numpad keycaps1, I needed a board to put them on. Let me tell you there are a lot of options:
 Full-size or 104 key (with an integrated number pad)
 Tenkeyless (TKL) or 80% (without a number pad)
 60% (no arrow, navigation or function keys)

40% (no numbers)
(Images generated using Keyboard Layout Editor.)
Those are just the most popular choices. You might be wondering why anyone would want fewer keys and the answer generally is to save desk space. People who don’t use the numeric key pad (AKA, ten key) prefer not to have so much space taken up by those keys. This is especially true of gamers who would prefer to keep their mouse near the WASD keys, which is a common control scheme for first-person shooters.
I didn’t include the layout I picked which is called a 75% layout because it’s somewhere between 80% and 60%. I use my ten key quite a bit thanks to a typing game2 my parents made me play before playing other games on our computer. While I enjoyed learning to touch type, I found the ten key training even more engaging because it was closer to the sorts of games I really wanted to play. As it happens, I’m competent (if not fast) when it comes to light data entry tasks.
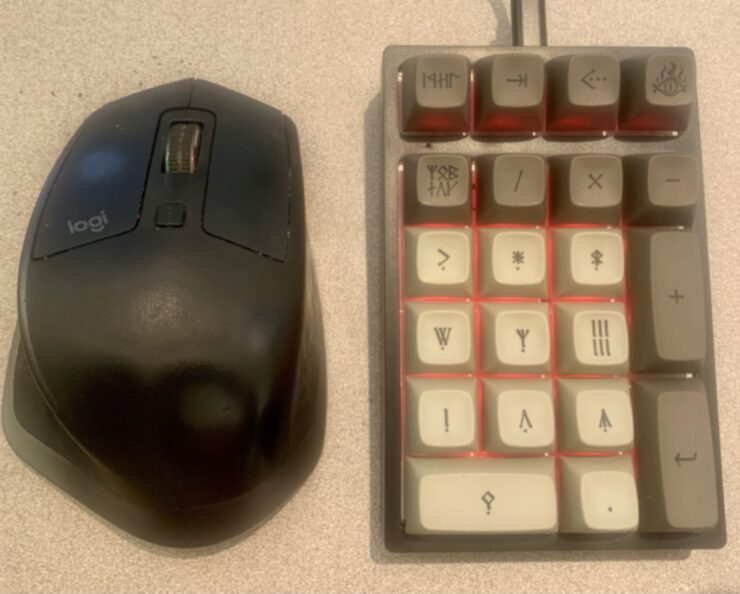
My solution was to buy a separate ten key pad (and the separate dwarvish num keycaps). That way I can put it nearby for when I need to enter a number into a form, but push it aside when I need more room for my mouse.
But back to the keyboard itself. I was interested in a more compact keyboard that has arrow and navigation3, the truth is I got excited about this particular board because of the rotary knob. By default the knob controls sound volume (including mute if you push it down). But I was much more excited about using it like an Atari paddle controller:
This is possible because the GMMK Pro supports custom firmware. Out of the box, it’s a fairly standard setup, but with a bit of programming I can remap the keys and change the way the key back-lights work. I did have to look up how to set the keyboard to receive the new firmware and Reddit had the answer. It requires holding spacebar and b while plugging in the board. Since most firmware puts the new firmware command on function-\, it’s not quite so annoying after the first time.
In order to get the setup I wanted, I created custom firmware using QMK4 You can see my code on GitHub. The critical changes are:
- Replacing
CAPS LOCKwith the Command/Win key (AKA:KC_LGUI) and - Arraigning the bottom right row to be: Control, Alt/Option, Command/Win (
KC_LCTL, KC_LALT, KC_LGUI).
When I started programming, CAPS LOCK was somewhat useful for entering FORTRAN programs and theoretically helpful for SQL keywords. But these days ALL CAPS makes people think you are yelling and messes up password entry. An Emacs trick is mapping the key to Control, but I find it slightly better to have emit the Windows/Command keystroke.
Meanwhile, the way Windows and MacOS swap the two keys to the left of the spacebar is particularly annoying. Since I have a MacBook, I just use that layout instead of breaking my muscle memory.
After using the keyboard for a few weeks, I discovered the spacebar got stuck sometimes. Several keys on a mechanical keyboard require stabilizers which keep wide keys from being depressed unevenly. Spacebar is particularly troublesome since it covers the width of 6 1/4 regular keys. So there’s a wire that stretches under the spacebar with spring-loaded pistons on either side to make sure the entire spacebar moves the same distance up and down. The stock stabilizers were prone to getting stuck, so the manufacturer offered a discount on better quality stabilizers for people who reported this problem.
When I got the GSV2 stabilizers, I opened the keyboard case for the first time. Or rather, I tried to open it. One of the screws was striped and wouldn’t come out. Thankfully the company replaced my initial keyboard at no cost. After replacing the stabilizers, it’s been functioning almost perfectly.
Not long ago I replaced my “V” key, which was getting flaky. Replacing the switch and going back to typing a moment later was immensely satisfying.
Here’s the final cost for my setup:
| Item | Cost |
|---|---|
| GMMK PRO 75% Custom Keyboard (Black) | $169.99 |
| Mechanical Keyboard Switches (Gateron) | $34.99 |
| GSV2 Premium Keyboard Stabilizers | $4.99 |
| Drop + The Lord of the Rings™ MT3 Training Dwarvish Base Kit | $109.00 |
| Drop + The Lord of the Rings™ MT3 Dwarvish Numpad | $35.00 |
| Darmoshark Mechanical Numeric Keypad | $42.99 |
| Total | $396.96 |
I bought them quickly because I was worried they would be sold out.↩︎
Not Mavis Beacon, but I believe a game called, imaginatively, “Typing Tutor”. I’m pretty sure it was a later version of this game from Academy Software that also included the much more evocative “Word Invaders” game. It’s kinda hard to Google this game because more recent typing games dominate the search results. I do know the game I played started on the home keys and advanced over time to include all letters, numbers, punctuation and the shift key. It also definitely included ten key training. It also introduced me to the word “jilt”, which it included constantly in typing test.↩︎
The four keys on the far right of my board from top to bottom are delete, page up, page down and end. But as we’ll discuss in a bit, I can map them to anything I like and it would be an option to make the delete key be the home key instead.↩︎
This stands for Quantum Mechanical Keyboard Firmware. At the time Glorious didn’t support MacOS with their Core software.↩︎